PSMailers Pressure Seal Solutions

Alphabet soup of folding styles... mmm mmm, confusing!

Posted by PSMailers Guy on Fri, Aug 7, 2015 @ 13:08 PM

Alphabet Soup

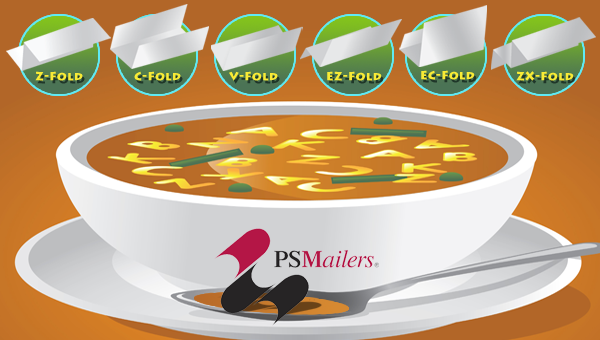
Apologies for planting the Campbell’s Soup earworm in your head. (At least I didn’t mention your favorite bologna…you know, the one with a first name and last name…or a certain cat food mix that will leave you mentally meowing in double time). But you see, I was reviewing the many fold styles available for use with PSMailers… C-fold, V-fold, ZX-fold… and I realized this alphabet soup of letters likely stirs up a hot cup of confusion for many users. I figured that PSMailers Guy fans (I know you’re out there) would appreciate having these spelled out clearly.


Below are the six available fold styles of PSMailers documents:

FOLD STYLE ALIAS DESCRIPTION/USES SIZE(S) AVAILABLE
Z-Fold "Accordion style" Z-Fold This is the most common fold style. Creates the letter "Z" when folded; easy-open style good for forms, checks and other mailings. 8.5" x 11" 8.5" x 14"
C-Fold "Letter" or "Tri-Fold" Great for checks and forms. 8.5" x 11" 
 V-Fold "Half Fold" or "Single Fold" Forms the letter "V" when folded, provides generious space for information.   8.5" x 11" 
 EZ-Fold "Eccentric Z-Fold" Uneven Z-Fold, great for checks and forms that need a little more print real estate.   8.5" x 14"
 EC-Fold "Eccentric C-Fold" Legal size accommodates a fourth panel for return envelope.   8.5" x 14"
 ZX-Fold "Z-Fold with extra voucher" Legal size version of the Z-Fold with a fourth panel that creates a detachable voucher ideal for printing A/P checks.   8.5" x 14"

To learn more about PSMailers documents contact us @ www.psmailers.com\contact-us\sales-form\  or email support@psmailers.com for more information. With so many styles and imprint options to choose from, you’ll be thinking “mmm mmm good!”


Yours in blogging, from soup to nuts

~PSMailers Guy

Topics: PSMailers, pressure seal, self mailer, z fold, pressure seal equipment, fold plates, pressure seal method, pressure seal documents, c fold, folder sealer, business forms, ez fold, alphabet, v fold, ec fold, zx fold

7 Easy Steps to Setup Pressure Seal Equipment

Posted by PSMailers Guy on Thu, May 24, 2012 @ 16:05 PM

Pressure seal equipment can help manage the labor costs spent on time-intensive tasks such as manually folding and sealing envelopes for bulky mailings. Setting up pressure seal equipment for use when purchased takes just seven easy steps... and seven may sound like a lot at first, but I'm including steps like Step One: be careful taking the machine out of the box because it's really heavy! Don't forget that with any of the more technical steps, we have trained (friendly!) support staff ready to guide you through the process.

Let's get started.

Step One: Unpacking your pressure seal equipment

The weight of your new pressure seal equipment and tool kit is at least fifty pounds, so when taking it out of the packaging it may be necessary to have an extra person or business employee on hand to help you lift it properly and avoid the chance of serious injury. 

Step Two:  Insert the paper guides and adjust to the proper width.

One thing that can slow down business productivity is when paper gets jammed in the equipment, preventing it from working properly. This problem can be avoided using the paper guides. Carefully insert the paper guides and adjust to the proper widths to ensure documents will load and print efficiently.

Step Three:  Position your Fold Plate Stops.

You need to verify that both Fold Plate Stops are set to the correct position to the form-style you will be using for your mailings – Z-fold, C-fold, EZ-fold, or V-fold. 

Step Four:  Install the Fold Plates

Both the upper and lower fold plates must be installed according to instructions to ensure your pressure seal equipment works effectively.

Step Five:  Follow procedures to plug-in the machine

Plugging in your pressure seal equipment is certainly simple enough, but to ensure that everything continues smoothly it helps to first plug the power cord into the machine before plugging it into the wall outlet.

Step Six:  Turning on the machine

Flip the lower power switch to the “On” position and give your machine a few minutes to warm up. Your pressure seal equipment is almost ready to use.


time savingsmoney savings

(Get excited, you're about to save time and money!)

Step Seven:  Running the Machine

To run the PSM1800 machine, you can push the Start/Stop Switch on the machine's Control Panel. The feed system is preset, but if adjustments need to be made, you can refer to your Operator’s Manual. Remember when loading the machine, the glue leading edge should be facing upward.

Now you're ready to start doing business more efficiently!

Topics: pressure seal equipment, pressure seal method, company efficiency, pressure seal installation guide